Have you ever tried to press Windows + Shift + S on your Windows laptop/PC to capture a screenshot, only to find that it’s not working as expected? This handy shortcut allows you to quickly open the settings for the Snip & Sketch tool, which helps you take screenshots of your full laptop/PC screen or selected areas with ease. it can be frustrating when you recognize issues that disrupt your workflow, such as the “Windows Shift + S Not Working” problem.
Before you begin, try this Quick fix. Here’s how
Quick Fix to Windows Shift S Not Working
If this problem arises, you can try to reset the Snip & Sketch app, which can resolve issues:
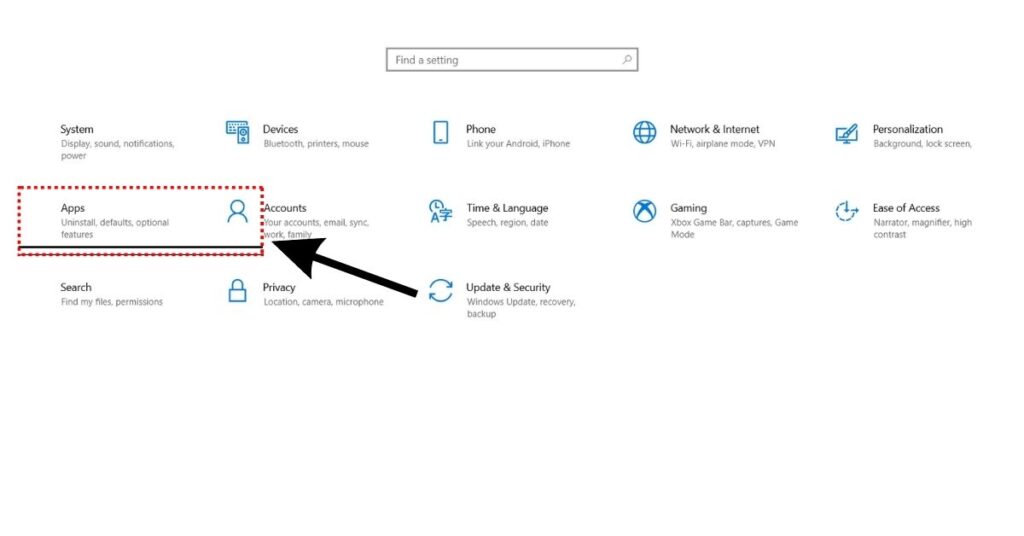
Step 1. Open “Settings” and select “Apps” or “Apps & Features,” depending on your Windows version.
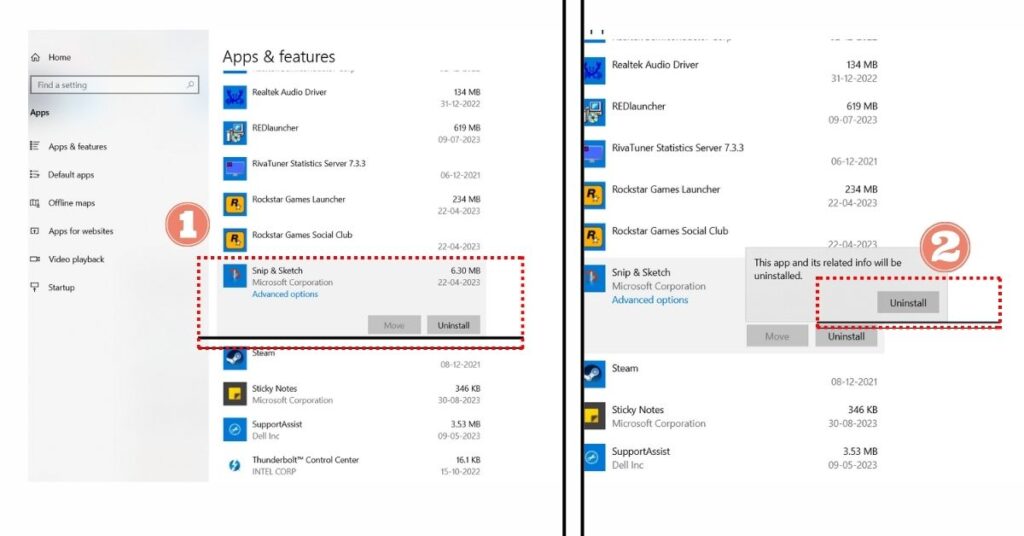
Step 2. Scroll down and Search for/locate “Snip & Sketch.”
Step 3. Click on “Advanced Options.”
Step 4. Click the “Reset” button. Confirm your choice when prompted.
Check if your problem is resolved. If not, don’t worry, there are a few fixes that you can try. but before starting let’s know some common reasons windows + shift + s not working
Common Reasons for Windows Shift S Not Working
- Windows Update: An outdated or buggy Windows update can sometimes cause issues with keyboard shortcuts. Ensure your Windows operating system is already up to date.
- Keyboard Hardware Issues: Physical issues with your keyboard, such as a stuck Shift key, can prevent shortcuts like Shift + S from functioning correctly. Test your keyboard with other key combinations to check if it’s working correctly.
- Third-Party Software: Certain third-party software or keyboard management tools can override or modify system shortcuts. Check if you have any such software installed and configure them accordingly.
- Screen Snip Disabled: If you have accidentally disabled the Screen Snip tool, Shift + S won’t work. Re-enable it in your Windows settings.
- Problems with Windows Explorer: As you know Snip & Sketch is a part of the Windows Explorer service, any issues with Windows Explorer might also affect the screenshot feature. Restarting the Windows Explorer process can resolve the error in such cases.
Also Read: Is It Okay To Use Laptop While Charging?
Okay – so we have known some reasons.
But how can we fix these problems?
Here are the fixes. you don’t have to try all, just work in your way Scroll down the list unless you find the one that works for you.
Fixes for Windows Shift S Not Working Issue
Turn on Clipboard History
The thing you can do is make sure that the clipboard history feature is turned on. The screenshot you captured will automatically copy to your clipboard. To view that screenshot, you can turn on clipboard history. Here’s how:
Step 1. Press your keyboard’s Windows + I keys to open the Settings.
Step 2. In the Settings interface, click on “System“.

Step 3. Click Clipboard, in the left panel. then turn on Clipboard history.

Also Read: Laptop Keyboard Not Working? Here’s How To Fix It In No Time
Turn on Snip & Sketch Notifications
Shortcuts to the snipping tool will only work if the application notifications are turned on. You need to turn the notifications on via settings. Here’s how:
Step 1. Press your keyboard’s Windows + I keys to open the Settings.
Step 2. In the Settings interface, click on “System“.
Step 3. In the System interface, click on “Notifications & Actions“.
Step 4. Scroll down the right window and locate “Snip & Sketch“. Make sure it is turned on.

Also Read: Is Your Laptop Touchpad Not Working? Here Are 10 Fixes
Reinstall Snip & Sketch
If Turning on Snip & Sketch Notifications doesn’t help, To resolve the problem, you can reinstall the app from the Windows store. Here’s how:
Step 1. Press your keyboard’s Windows + I keys to open Settings.
Step 2. In the Settings app, click on Apps” or “Apps & Features,” depending on your Windows version.
Step 3. Scroll down the right window, locate “Snip & Sketch” and click the Uninstall button. after that In the pop-up window, click Uninstall again.
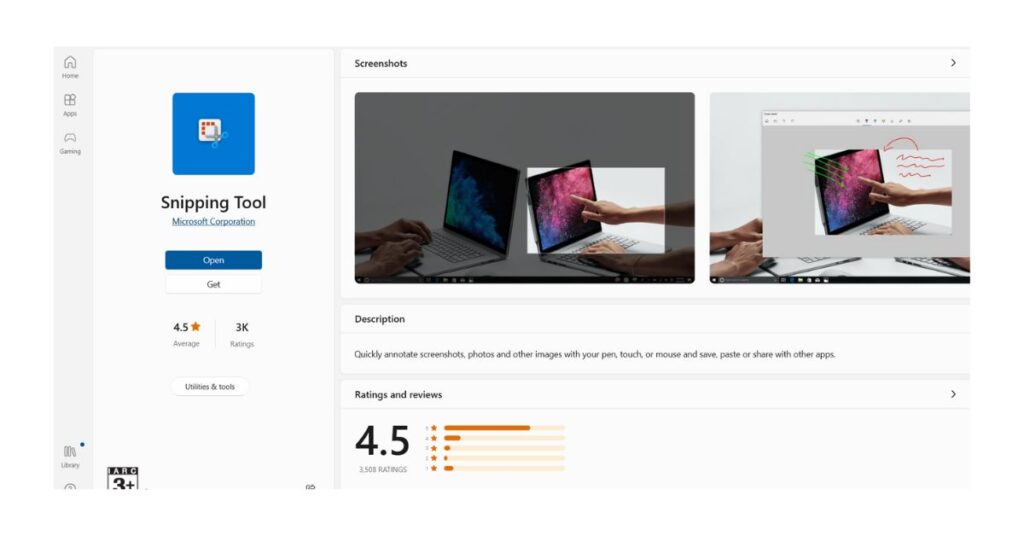
Step 4. After uninstalling Snip & Sketch, go to Microsoft Store and search for the Snipping tool. download and reinstall the app on your system.
Also Read: Want to Enable On-Screen Keyboard Display? Here Are 6 Ways
Check for Windows Updates
Updating Windows is a way around any problems you may issues. You can update your windows to the latest version to ensure that the snipping tool works properly. Here’s how:
Step 1. Press your keyboard’s Windows + I keys to open the Settings.
Step 2. In the Settings app, click on “Update & Security“.

Step 3. In the left panel, click on “Windows Update“.
Step 4. In the right panel, click on “Check for updates“.
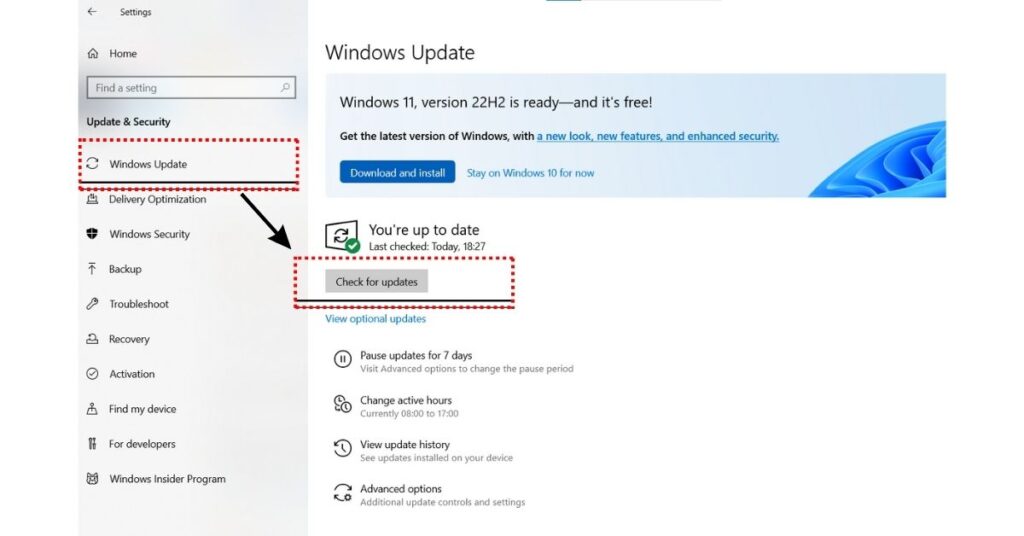
If you see that any updates are available, you can download and install them automatically. You may need to restart your laptop/PC for the updates to take effect.
Restart Windows Explorer
Some users have reported that restarting Windows Explorer from Task Manager fixed the problem. If this Windows Core System file is corrupted, it can also affect the performance of other applications. so try to restart Windows Explorer. here’s how:
Step 1. On your laptop/PC keyboard, press Ctrl + Shift + Esc at the same time to open Task Manager.
Step 2. Go to the Process tab.
Step 3. Search for the Windows Explorer from the list.
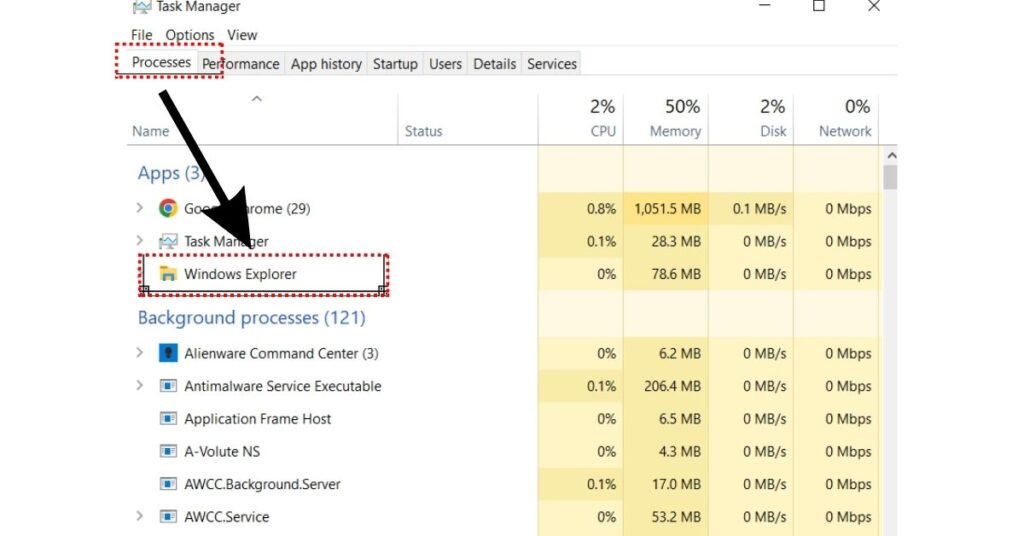
Step 4. Right-click on Windows Explorer and select Restart.

Physically Clean Your Keyboard Keys
The “Windows Shift S is not working” problem can be caused by unwanted sand or particles that have gotten stuck under your keyboard keys, and the keypress action doesn’t move every time you press the keys.
So we need to take care of our keyboards, especially the ones in our laptops because they are much more prone to damage than mechanical keyboards.
Check Out: How to Clean Laptop Keyboard?
Restart Your Laptop/PC
Sometimes, a quick restarting of your laptop/PC can fix many problems and bugs in your device. It is a simple trick that is worth trying once. Here’s how:
Step 1. Click on the Windows button on the laptop/PC. Which is available at the bottom left corner.
Step 2. Click on the Power icon and select the “Restart” icon in the pop-up window. Your laptop/PC will close all open programs, save any unsaved data, and then restart.
Alternatively, your laptop/PC can be restarted by pressing the “Ctrl + Alt + Delete” keys on your keyboard at the same time and then clicking on “Restart” in the pop-up window.
Also Read: Is Your Laptop Overheating? How Can You Fix It?
Kill the Screen Snipping Process
Also, you can try to kill the Screen Snipping process in Task Manager. Here’s how:
Step 1. On your laptop/PC keyboard, press “Ctrl + Shift + Esc” at the same time to open Task Manager.
Step 2. Right-click on “Screen Snipping” and select End task.

Use Keyboard Hotkey Combinations
If all the above methods fail to solve your problem, you can still try to use it with other keys together to take screenshots. Here’s how:
Method 1. Press the “Windows + PrtScn” keys together on your laptop/PC keyboard. This will capture a screenshot of the entire screen and save it as a file in the “Screenshots” folder in your “Pictures” library.
Method 2. Press the “Alt + PrtScn” keys together on your laptop/PC keyboard. This will take a screenshot of the currently used window, (the window which you are currently using) and save it to the clipboard. After that, you can paste the screenshot into an image editing program or document to save it.
Also Read: Best 20 Laptop Shortcut Keys That You Are Not Using
Final Words
Hope, the solutions which are listed here might have helped you in identifying the problems that might be causing your problem. By implementing these simple however powerful tips, you can solve your problem.
FAQs
A: Yes, there are alternative methods to capture screenshots on Windows, such as using the “Windows + PrtScn.”
A: There can be several reasons for this issue, including software conflicts, system updates, or incorrect settings. This article provides solutions to help you identify and fix this problem.
A: Windows Shift-S is commonly used to capturе screenshots or portions of the screen. It’s a convenient feature for taking snapshots of your desktop.
A: When you use the “Windows key + Shift + S” shortcut to take a screenshot, the screenshot isn’t saved automatically. Instead, it copies the screenshot to your clipboard. You can then paste it into an app like Microsoft Paint or a document by pressing “Ctrl + V.”
A: Screen snips from tools like “Snip & Sketch” aren’t automatically saved. It’s copied to your clipboard, and you need to paste it into an app or document to save or use it.
A: To fix the Snipping Tool in Windows 10, ensure your Windows is up to date, try resetting the Snipping Tool through “Settings,” or consider using the built-in Snip & Sketch tool for similar features.