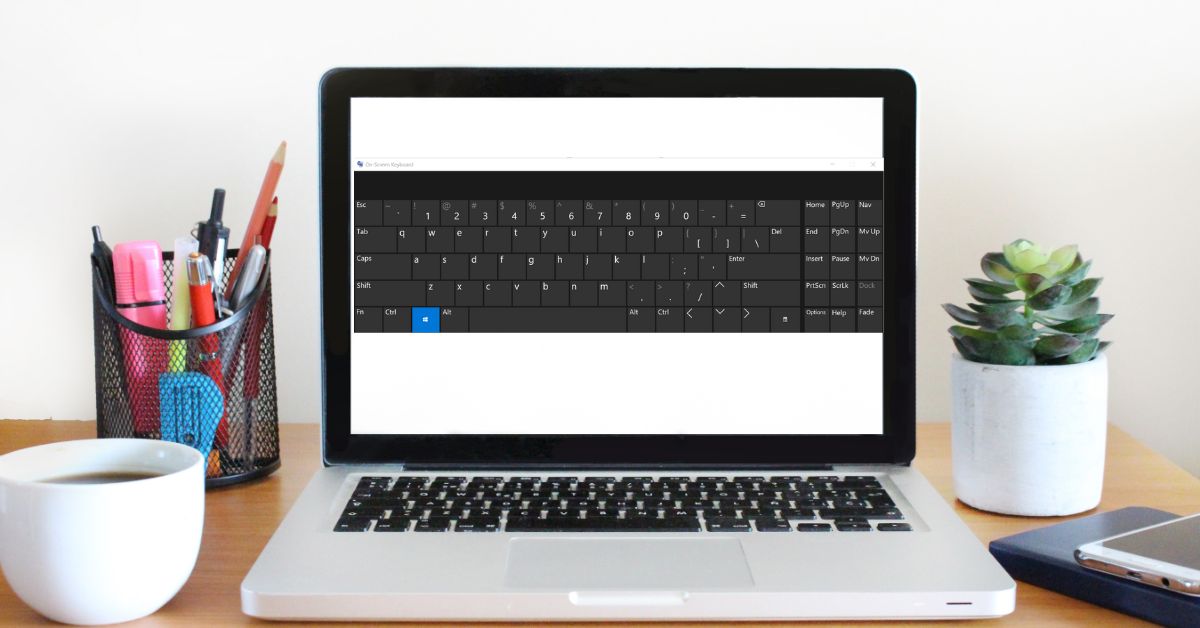
Have you ever thought of using a keyboard without an external keyboard? Windows provides an on-screen keyboard display option (also called OSK) that allows you to type even if you don’t have access to a physical keyboard. It’s beneficial with a touchscreen, but you can also use it to order with a mouse or even type with a game controller from your sofa.
So, how can you turn on the On-Screen Keyboard Display option in Windows 10? Let’s see how:
How to Enable on Screen Keyboard Display Option in Windows 10
Here are listed 6 common ways to enable the On-Screen Keyboard display option in Windows 10.
Way 1: On-Screen Keyboard Display Option in Settings.
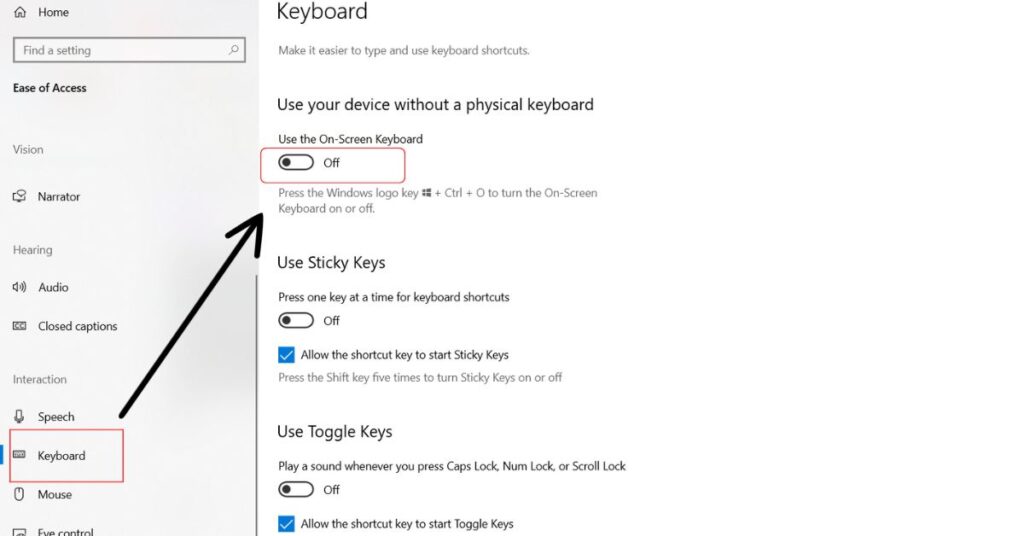
Step 1: Open “Settings” and then select/choose “Ease of Access”.

Step 2: Locate/Search for “Keyboard” in the “Ease of Access” left window and click it.
Step 3: Turn on the switch under “Use the On-Screen Keyboard“.
Also Read: Shift S Not Working? HERE ARE 9 Ways To Fix It
Way 2: On-Screen Keyboard Display Option in Ease of Access Center.
Step 1: First, Navigate your mouse cursor to the “Windows Search Box“.
Step 2: Type CP in the search box and click “Control Panel“.

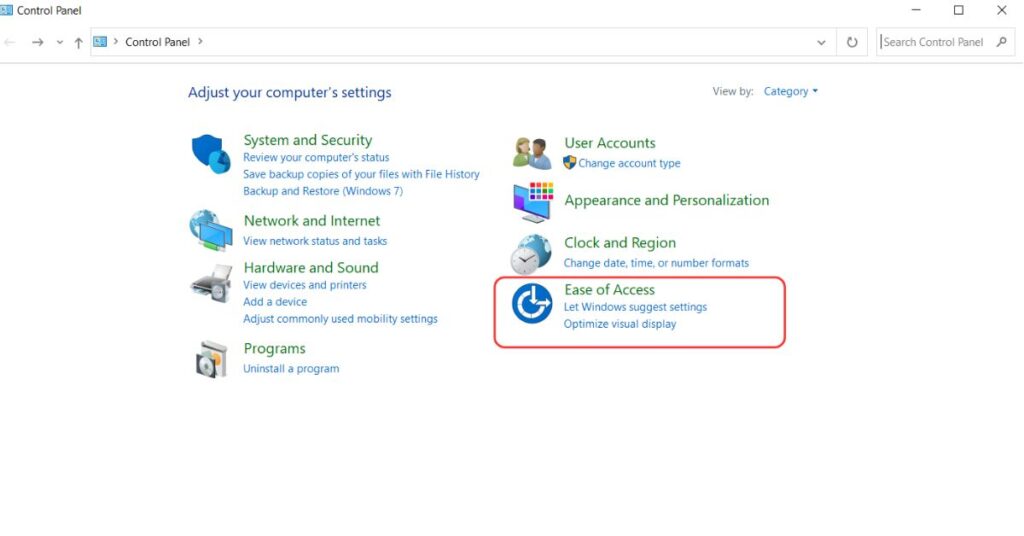
Step 3: Click/Select “Ease of Access” In the Control Panel.
Step 4: After that go to “Ease of Access Center“.

Step 5: Click “Start On-Screen Keyboard“. Then you can use this on-screen keyboard to finish your work.

Way 3: Open the Keyboard through the Search Box.
Step 1: Navigate your mouse cursor/pointer to the “Windows Search Box“.
Step 2: Input OSK (that means On-Screen Keyboard) and Click “On-Screen Keyboard” in the results.

In no time, the On-Screen Keyboard will display on your PC/laptop.
Also Read: Is It Okay To Use Laptop While Charging?
Way 4: Open OSK with the Help of Command Prompt.
Step 1: Navigate your mouse cursor to the “Windows Search Box“.
Step 2: Type CM in the search box and click “Command Prompt“.

Step 3: A popup window appears in your display. Type OSK in the Command Prompt and press Enter. Soon, you can see the On-Screen Keyboard on your PC/laptop.

Way 5: Turn on This Keyboard by Means of Run.
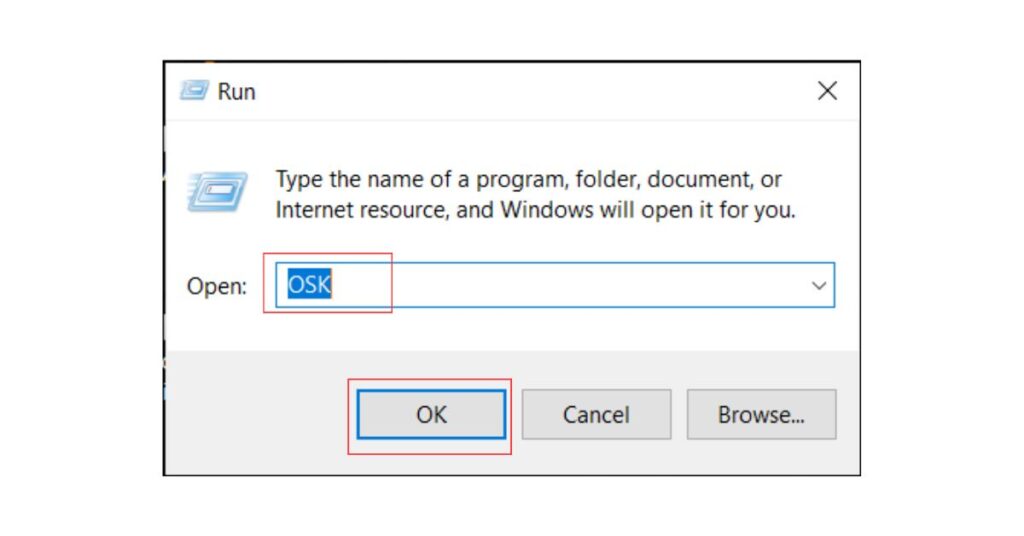
Step 1: Right-click the Start icon on your PC/laptop, and choose “Run” in the Quick Access Menu.

Step 2: Type/input OSK and click OK in the Run dialog. Soon, the On-Screen Keyboard shows up on your PC/laptop.
On-Screen Keyboard Shortcuts
The quickest way to open an on-screen keyboard in Windows 10 is with the [Windows] + [Ctrl] + [O] shortcut. In the same way, if the physical keyboard is unavailable and damaged, the on-screen keyboard can be activated immediately.
You may notice that there is no numeric keypad on the on-screen keyboard. Generally, it can be enabled. let’s see how:
How to Enable the Numeric Keypad on the On-Screen Keyboard?
Step 1: Left-click the Start icon on your PC/laptop.
Step 2: Type OSK in the search box and open “On-Screen Keyboard”.

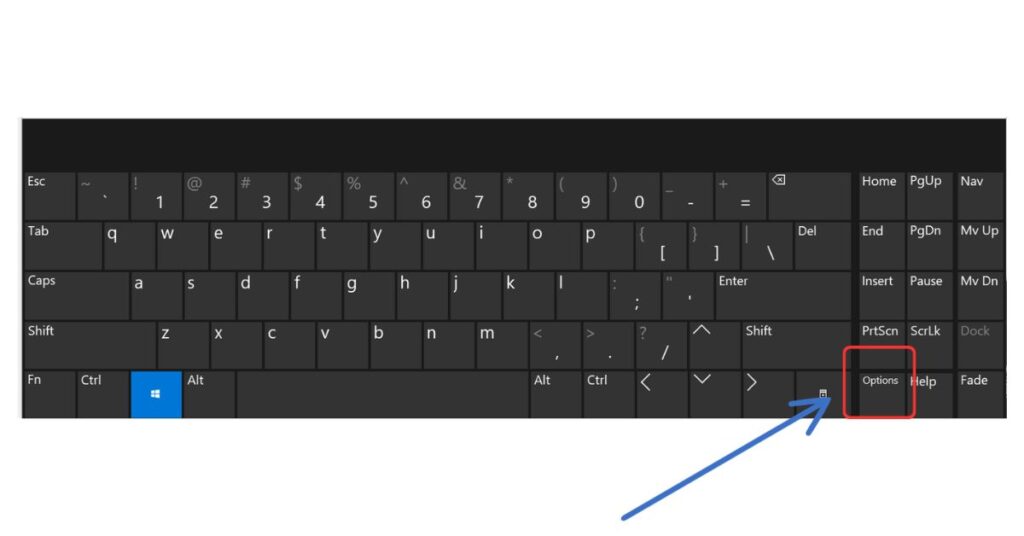
Step 3: Then, A virtual keyboard will appear on your screen. Click the “Options” key which is located in the lower-right corner of the window.
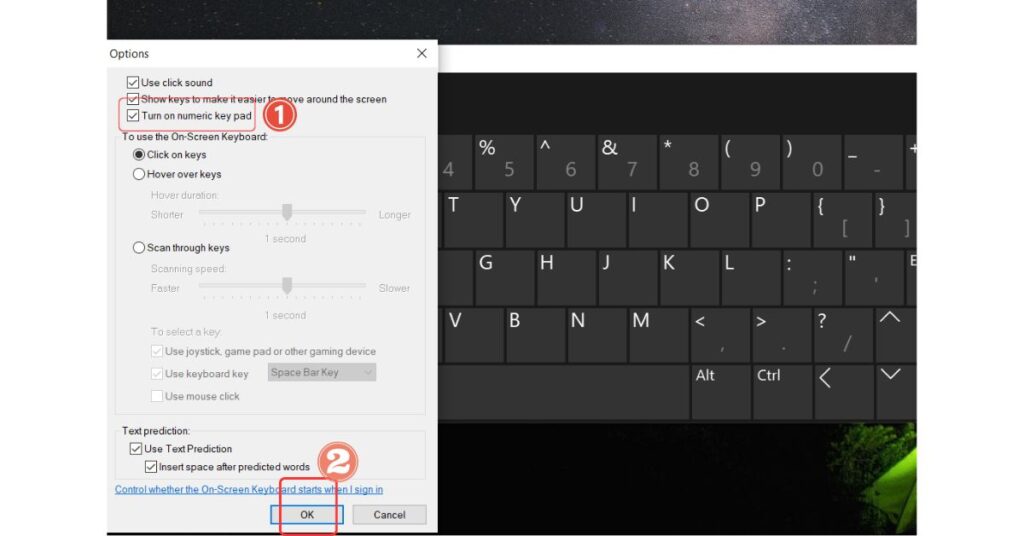
Step 4: Make sure the check box next to “Turn on numeric key pad” is checked inside the window that appears. If it is unchecked then check the box and click “OK”.
Now you may have seen the numeric keypad on the on-screen keyboard.
Also Read: How to Clean Laptop: Pro Tips and Step-by-Step Guide
How to Close the On-Screen Keyboard?
On your PC/laptop screen, press the “X” in the upper right corner of the window to close the on-screen keyboard application.

How to Disable the On-Screen Keyboard?
If the keyboard display option opens on the screen when Windows starts, it can be disabled and stopped from loading on Windows start-up. Here’s how:
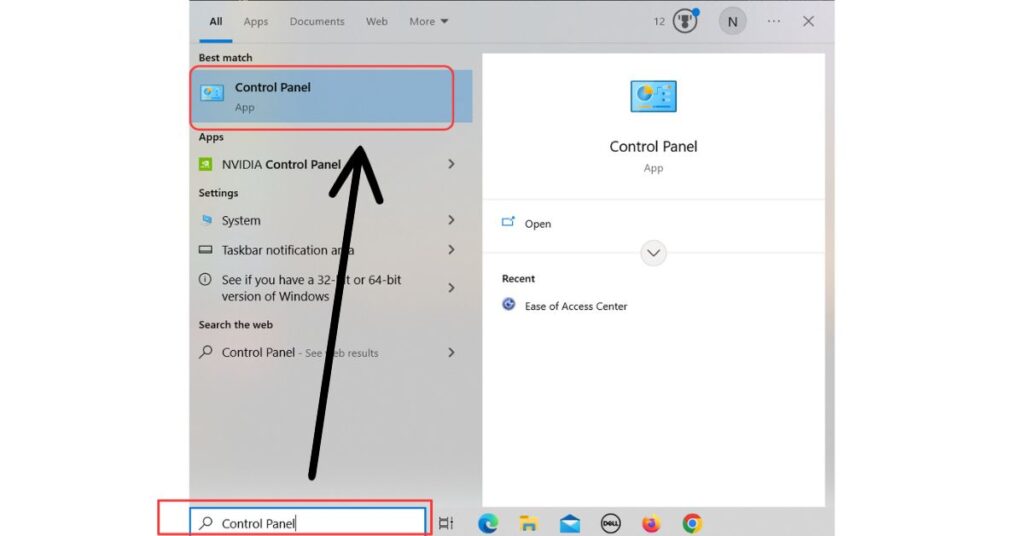
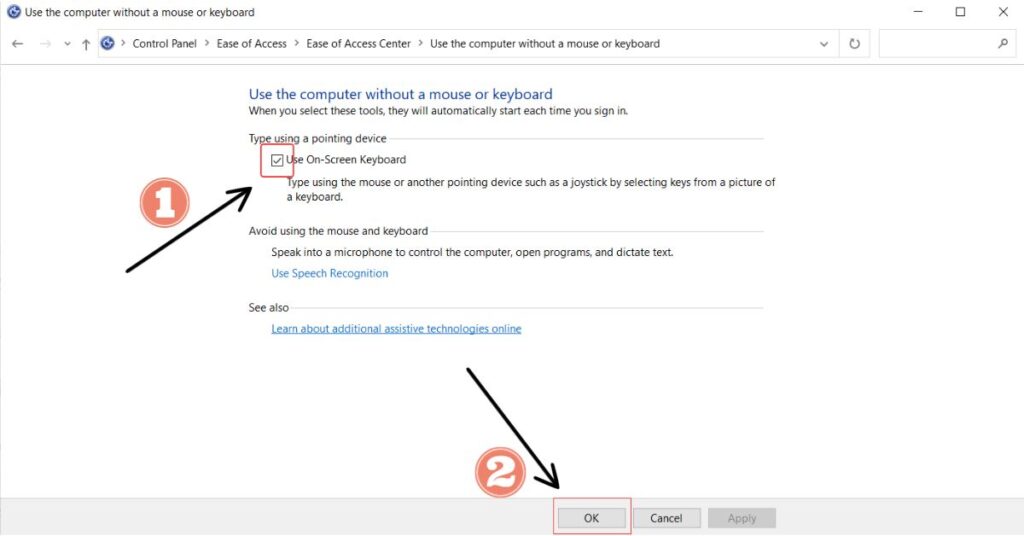
Step 1: Open the Control Panel: Take your mouse pointer to the “Windows Search Box” In the search bar that appears, type “Control Panel” and press Enter. This will open the Control Panel.
Step 2: Select “Ease of Access”: In the Control Panel click the Ease of Access icon. After that go to the “Ease of Access Center“.

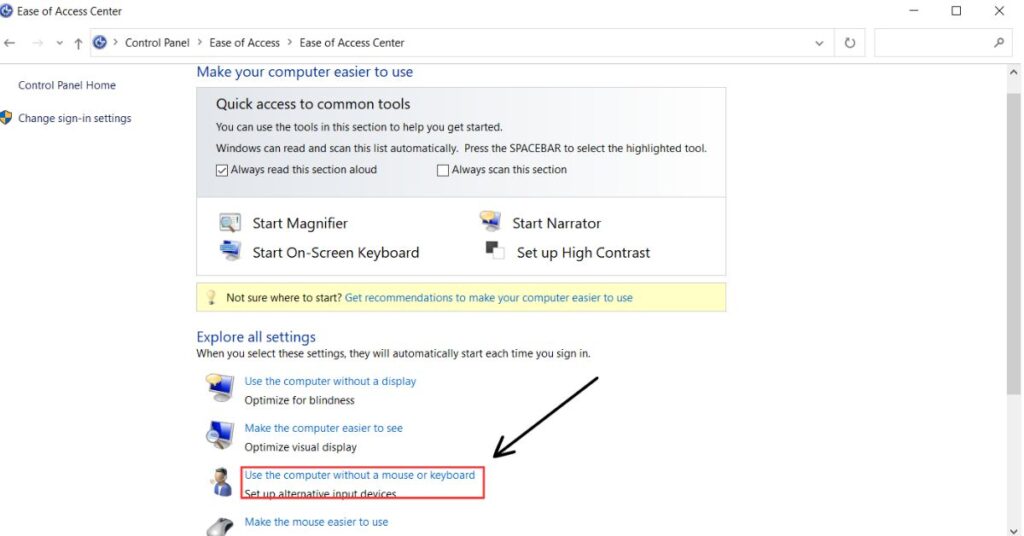
Step 3: Locate the Option: In the Ease of Access Center window, scroll down until you find the section titled “Explore all settings.” Within this section, you’ll see the “Use the computer without a mouse or keyboard” link. Click it.
Step 4: Uncheck the Box: To disable the on-screen keyboard, uncheck the box next to “Use on-screen keyboard“.
Step 5: Click OK: After unchecking the box, click the “OK” button at the bottom of the window.
Final Words
Hope, we might have successfully guided you. This article not only provides detailed steps on how to enable the on-screen keyboard display option but also includes additional information. By implementing these simple however powerful tips, you can solve your all problems.